Mrs Everybody has been spending her spare minutes making cheese. Yes, in the time it takes her to make a pot of tea, some toast and marmalade, she can start a new cheese. Later, the same or next day, Mr and Mrs Everybody can eat the cheese for supper.
During the summer months, milk from grass fed cows and goats is especially abundant and nutritious. Fresh cheese is particularly delicious, quick to make and tremendously healthy. Mrs Everybody would like to share her cheese making delights with you.
Cheese making is so simple. I hope that lots of people will try it and that parents and grandparents will make it with their children. Even if children are involved in making cheese just once in their lives, I am sure that they will always remember the experience. Cheese making involves separating milk into two constituents : The coagulated white solid curds are separated from the liquid greeny-yellowish whey. The curds, chiefly fats and casein protein are collected and formed into cheese. The whey, a liquid, high in lactose protein and whey proteins (lactalbumin) has other culinary uses.Two simple methods
In the first recipe, the milk is heated only to 32 degrees Celsius and Vegeren, a vegetarian form of rennet is added as a curdling agent. By keeping the temperature of the milk very low, at no more than 32 degrees Celsius, the ‘live’ enzymes in the milk remain active. This is my preferred recipe, since I am able to obtain raw goat milk from a small holder. The milk I buy has been neither, skimmed, homogenized nor pasturized. I treasure the raw status of my milk and cheese. In fact this small holder brought me into cheese making by making some for me and lending me a few books. So thank you for the milk and the knowledge! Don’t worry if you can’t get raw milk. You can use any brand of unhomogenized milk, or ‘gold top’ milk – that is the type of milk where the cream floats to the surface. You need unhomogenized milk for both of these recipes. The second recipe makes a cheese called ‘paneer’. It uses more heat - 80 degrees Celsius, and lemon juice instead of rennet. I use my really fresh milk for the first recipe cheese and older milk for the paneer. Both cheeses are delicious and fresh tasting.1st Recipe: Fresh Cheese with Vegetarian Rennet
Heating the Milk
Place your milk (I would suggest 1 liter if this is your first attempt!) in a steel, glass or ceramic saucepan. Heat the milk very slowly to 95 F (32 C). I stir the milk while it is heating to even out the heat and use a thermometer to check the temperature – it only takes a minute or so to bring the milk to the right temperature so don’t get distracted and scorch the milk!Preparing the Rennet
While the milk is heating, prepare your rennet. Add the right number of drops of rennet to a cup containing 1-2 tablespoons of cold water and swirl them together to give you rennet-water. The directions on the bottle of Vegeren will tell you how many drops to use per liter of milk.Mixing the Rennet-Water and Milk
… Now for the start of the transformation… Stir the warmed milk in a clockwise direction, take the spoon out. Whilst the milk is still swirling, pour on the rennet – water in an anticlockwise motion. They will mix together without the need for stirring. Allowing them to mix only through the counter-motion of the liquids gives the cheese a compact texture. Leave the mixture to stand for at least two hours or until you can see it has thickened or separated.How to form and drain the cheese
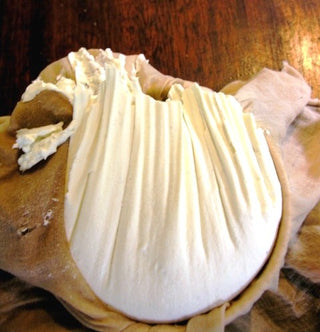
Scald your straining cloth, either a fine muslin or even a clean linen tea towel with boiling water, then lay the cloth in a colander or sieve. Place this arrangement in a large bowl and ladle or pour the curd and whey mixture on to the cloth. The whey will drain through the cloth and sieve into the bowl. Take the corners of the cloth and tie them together. Leave to strain for a while. After an hour or so, hang the bundle over a bowl to continue to drip overnight. This allows the whey to drain off the curds. The next day open the cheese bundle. Actually, I have opened mine within two hours, just because I couldn’t wait any longer. …Admire and eat your cheese!2nd Recipe: How to make Paneer Cheese with Lemon Juice
With this cheese you follow the same process as before, but bring the milk slowly up to 80 degrees Celsius. Again don’t get distracted, it only takes a few minutes to reach this temperature. Stirring the milk will help to help to prevent it scorching on the sides and base of the pan. Add the lemon juice instead of the rennet -water. I use the juice of one lemon for each litre of milk. You probably don’t need to use so much! After the few hours, the curds will obtain a yogurt like consistency. You might not see the separation of the curd and whey, just the whole pan will look like it contains yogurt. It is ready to place in the cheesecloth. Form your cheese as before.Using your Fresh Cheeses
 Paneer cheese drained in a linen tea towel. You can see that it has a softer consistency than the rennet cheese.


